Installation & Configuration
1. Frame Preparation
- Locate and mark the latchbolt centerline on the frame.
- Refer to the Strike Drill Sheet to mark all required holes.
- Punch, drill, and tap the marked locations accordingly.
Download the Strike Drill Sheet (PDF)
2. Wire Preparation
- Pull out the power supply wires through the hole at the strike level.
- Connect the power supply wires to the red and black wires coming out of the strike.
- (Optional) Connect the green and white wires to a dry contact for override commands, if required. Applying any voltage to those wires will damage the board and void the warranty.
- Secure and tidy up the wires within the door frame.
Important Notes
- The unit shall be powered by a listed UL 294, UL 603 or UL 2610 Class 2 power supply.
- The kit is intended to operate with a 12V to 24V DC power source providing at least 1 amp.
- It is suitable for temperatures between 32°F and 120°F (0°C and 49°C).
- Confirm the product cable length is sufficient before modifying the frame or mounting area.
- An electric locking mechanism shall not impair the operation of panic hardware mounted on the door nor the intended operation of an emergency exit.
- The lead wire shall not be spliced to a conductor larger than 18 AWG.
3. Strike Installation
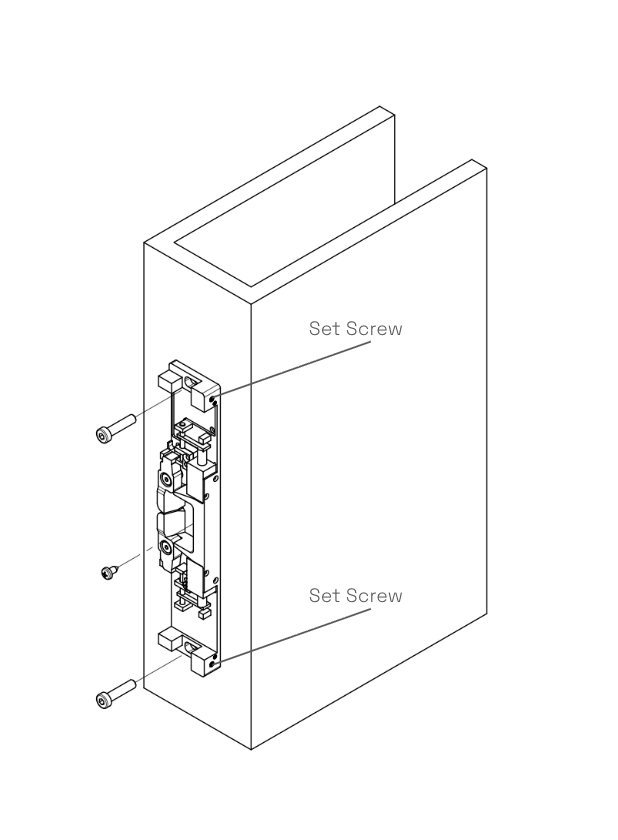
- Secure the electric strike to the jamb with the two mounting screws (C) provided.
- Verify latchbolt engagement and clearance with the keepers.
- Adjust horizontally and tighten the two mounting screws (C).
- Secure with set screws, ensure they're in contact with the mounting screws.
- Install the lockdown screw (E).
4. Configuration
- Download the KINDOO app on your phone, sign up, and log in.
- Create a new site if you don't have one and then tap "Add Entrypoint".
- Follow the app's instructions to create a new entrypoint.
- Choose "Link to a KIN".
- Hold your phone near the strike.
- The KIN S will link to your entrypoint.
5. Testing and Closing
- Test the full setup by using the app to unlock the strike and ensure it successfully unlocks. Wait a few seconds, then verify the strike automatically relocks.
- Install the strike cover (B) plate and secure it with the four cover screws.