Installation & Configuration
1. Frame Preparation
- Locate and mark the latchbolt centerline on the frame.
- Refer to the Strike Drill Sheet to mark all required holes.
- Punch, drill, and tap the marked locations accordingly.
Download the Strike Drill Sheet (PDF)
2. Activation Pad Installation
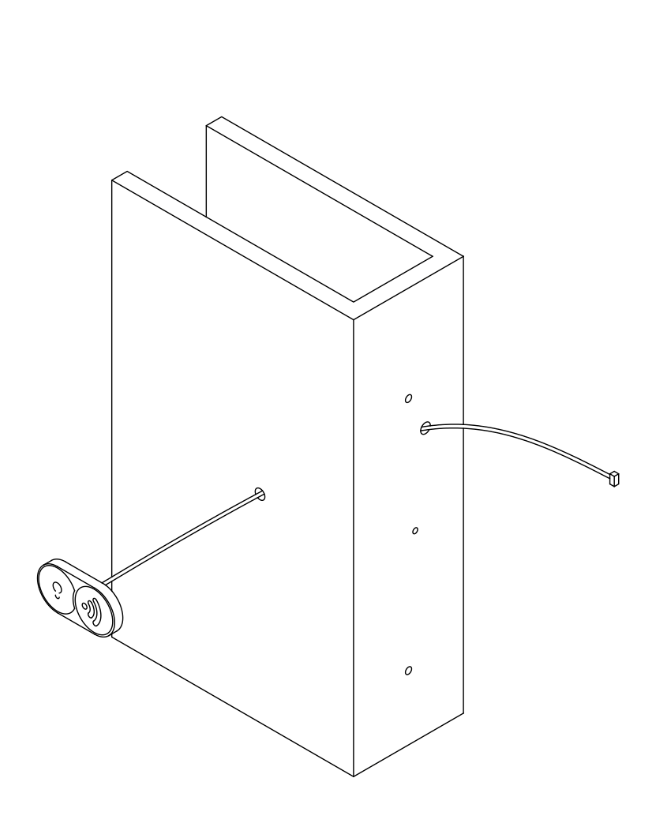
- Select a location on the external door frame for the activation pad (H).
- Drill a 3/8" hole for the wire harness.
- Clear any debris from the surface and clean it with the provided alcohol swab.
- Thread the wire through the drilled hole to reach the strike location.
- Peel off the adhesive tape cover from the activation pad.
- Place the activation pad in position and press for 1 minute to adhere.
Important Notes
- The provided button is IP65 rated. It has the highest level of dust protection, and is able to withstand low-pressure water jets from all directions.
- It is suitable for temperatures between 0°F and 120°F (-20°C and 49°C).
- Confirm the product cable length is sufficient before modifying the frame or mounting area.
- Make sure the harness channel is deep enough to reach the strike body harness.
3. Battery Box Installation
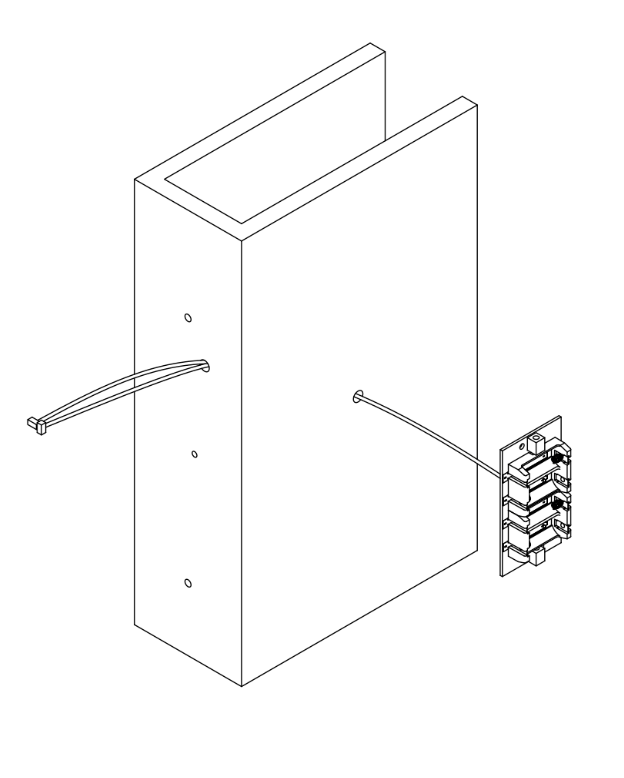
- Find a flat surface on the internal side, next to or on the door frame.
- Mark and punch the center of the wire exit hole.
- Drill a 3/8" hole for the wire harness.
- Clear any debris from the surface and clean it with the provided alcohol swab.
- Peel off the adhesive tape cover from the battery box.
- Thread the wire through the drilled hole.
- Position the battery box (F) and press for 1 minute to adhere.
4. Wire Preparation
- Pull out the battery pack and activation pad wires at the strike level.
- Identify the battery and activation pad connectors on the back of the strike.
- Attach the activation pad wire to the strike.
- Connect the battery wire to the strike.
- Secure and tidy up the wires within the door frame.
Important Notes
- The battery box is intended for indoor use, in environments with temperatures between 50°F and 120°F (10°C and 50°C).
- Confirm the product cable length is sufficient before modifying the frame or mounting area.
- Make sure the harness channel is deep enough to reach the strike body harness.
- An electric locking mechanism shall not impair the operation of panic hardware mounted on the door nor the intended operation of an emergency exit.
- The lead wire shall not be spliced to a conductor larger than 18 AWG.
5. Strike Installation
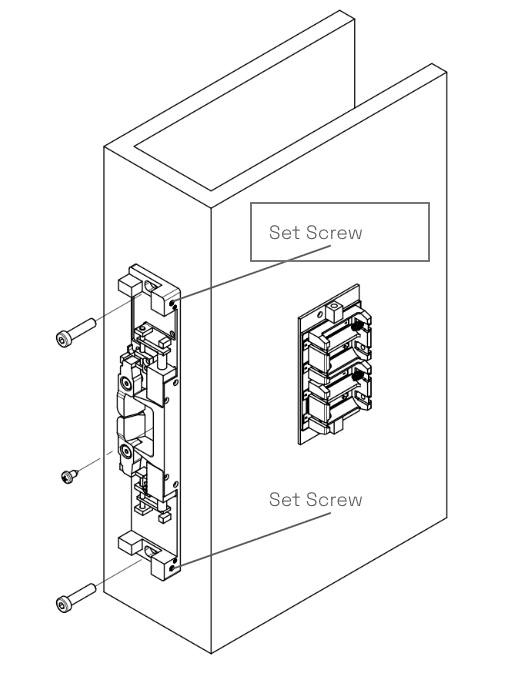
- Secure the electric strike to the jamb with the two mounting screws (C) provided.
- Verify latchbolt engagement and clearance with the keepers.
- Adjust horizontally and tighten the two mounting screws (C).
- Secure with set screws, ensure they're in contact with the mounting screws.
- Install the lockdown screw (E).
6. Configuration
- Install 4 x CR123A batteries in the battery box.
- Download the KINDOO app on your phone and create a new site if you don't have one.
- Tap "Add Entrypoint" and follow the app's instructions to create a new entrypoint.
- Choose "Link to a KIN".
- Press the external activation pad.
- Hold your phone near the strike.
- The KIN S will link to your entrypoint.
7. Testing and Closing
- Test the full setup by using the app to unlock the strike and ensure it successfully unlocks. Wait a few seconds, then verify the strike automatically relocks.
- Place the battery cover (G) to close the compartment and tighten the two cover screws.
- Install the strike cover (B) plate and secure it with the four cover screws.